Download
Netmaker Desktop allows authorized employees to connect to company resources from anywhere across their devices
The Netclient runs on devices and servers, managing peer-to-peer connections. It is always on and can act as a gateway
Install Netclient on Windows
Install Netclient on Mac
(optional) brew audit netclient
brew install netclient
Install Netclient on Linux
Install as DaemonSet
Deploy netclient to all nodes in your Kubernetes cluster.
Install as K8s Operator
1. Add Helm repository
Add the Netmaker Kubernetes Operator Helm repository.
helm repo add netmaker-k8s-ops https://downloads.netmaker.io/charts/
helm repo update2. Install the operator
Install the Netmaker Kubernetes Operator using Helm.
helm install netmaker-k8s-ops netmaker-k8s-ops/netmaker-k8s-ops \
--namespace netmaker-k8s-ops-system \
--create-namespace \
--set image.repository=gravitl/netmaker-k8s-ops \
--set image.tag=latest \
--set netclient.token="<token>"Learn more about the Kubernetes Operator at learn.netmaker.io/kubernetes-operator
Netmaker allows you to generate and manage your VPN configuration files. You can get the WireGuard VPN configuration by following these steps:
- Navigate to your network's Remote Access tab. You should see:
- The Gateways table on the left-hand side
- The VPN Config Files table on the right-hand side of the page
- If you have multiple gateways, select the specific one by clicking on it (if it hasn't been selected already).
- If necessary, find the VPN configuration by inputting its name in the Search box.
- Once you've located the configuration file, hover over or click on its 'kebab' icon in the right-hand corner of the row. A context menu should appear.
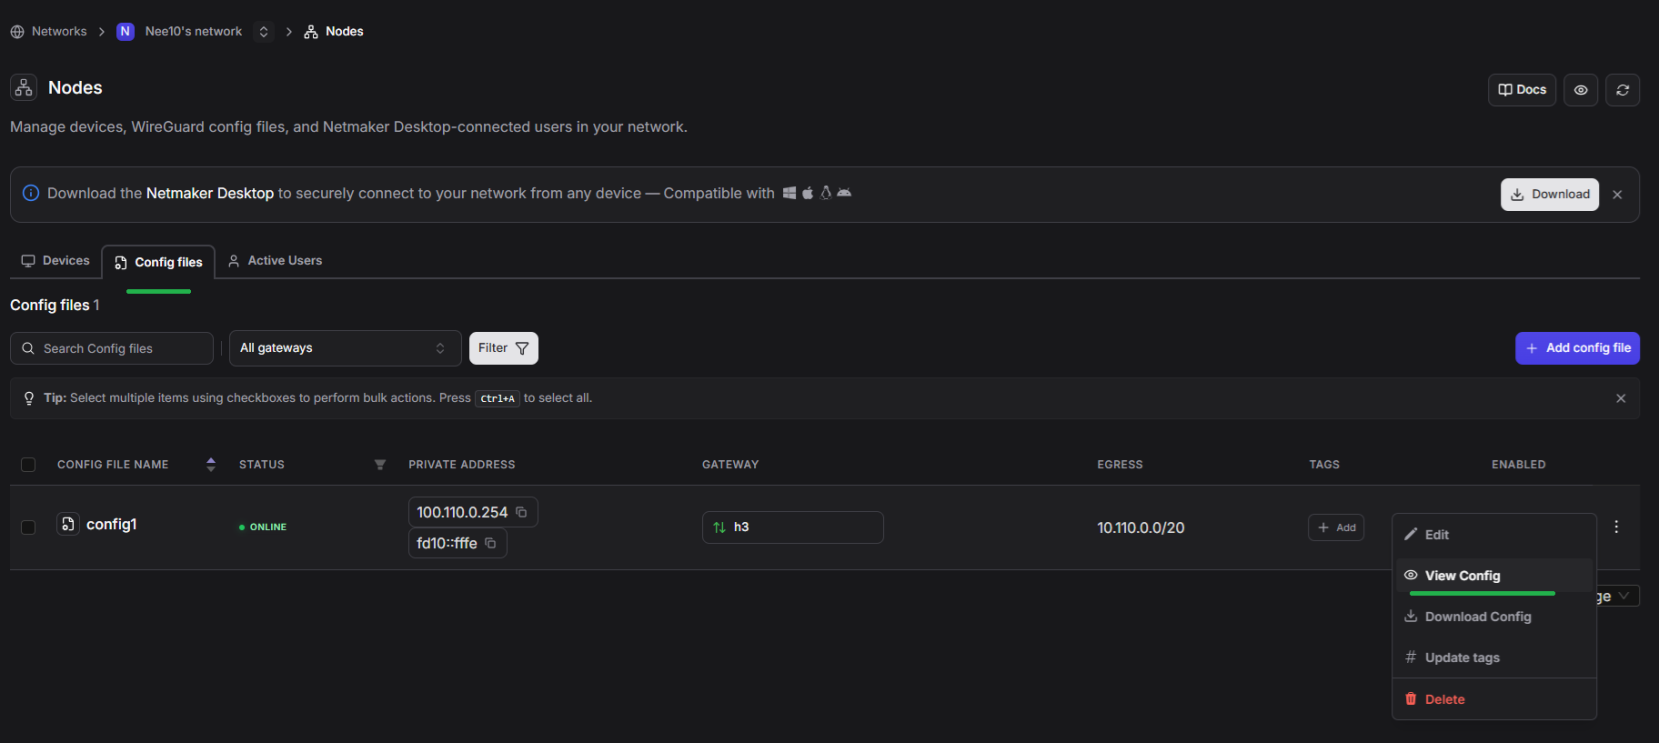
In the context menu, you have two options:
- Click on 'View Config' to view and copy the configuration file.
- Click on 'Download' to get a copy of the configuration file.
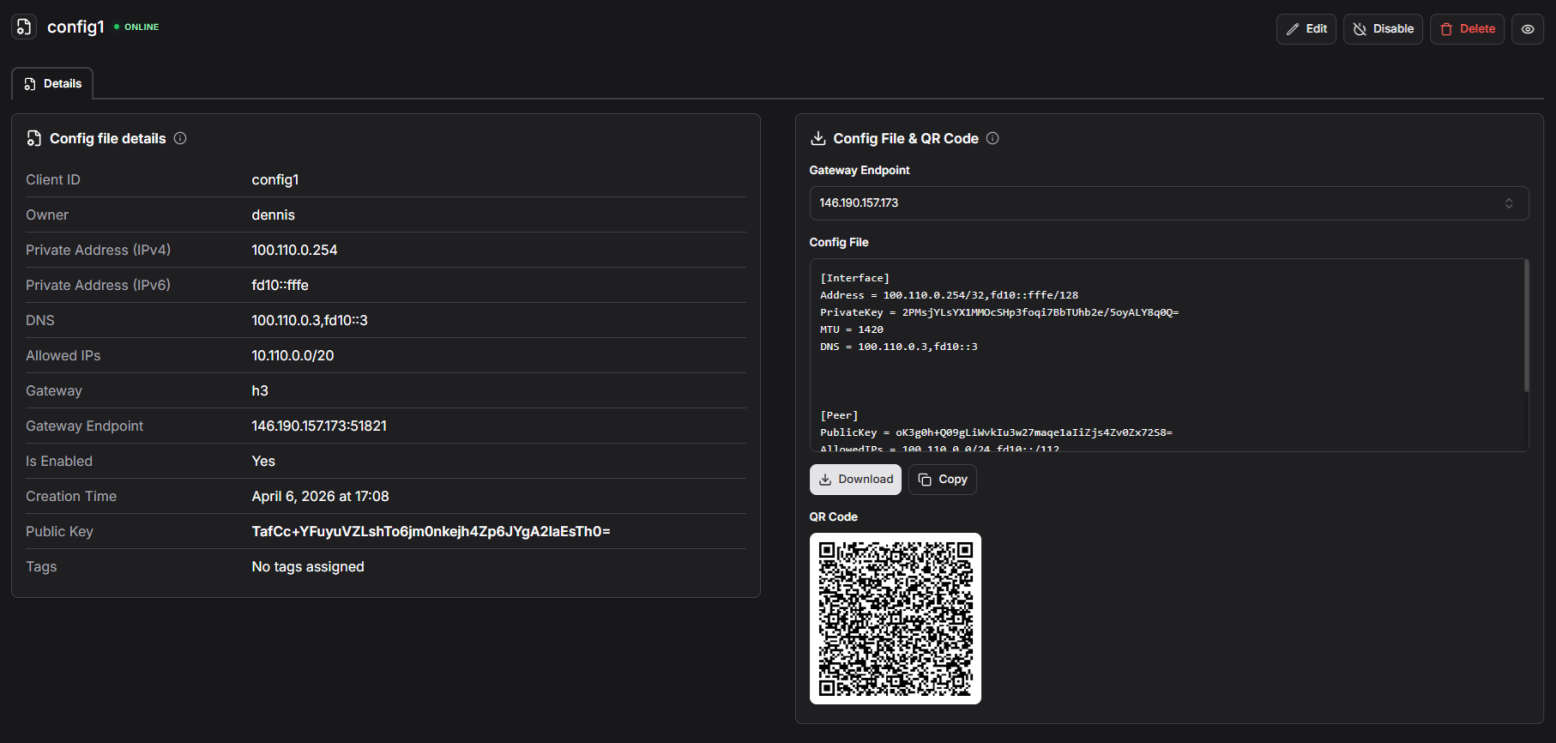
Using the Configuration
Once you have the configuration information or the configuration file, you can apply it to your router:
1. pfSense
This guide will help you set up WireGuard on pfSense 2.7.2. We will connect to a Netmaker network via a Gateway.
- Install WireGuard using the Package Manager in System -> Package Manager -> Available Packages
- Go to VPN -> WireGuard -> Tunnels, and create a new WireGuard tunnel using the configuration information provided by Netmaker. Click on the Generate button under the Interface Keys fields before pasting the Private Key (from the configuration file generated by Netmaker). Save or submit the form and take note of the tunnel interface name.
- Go to VPN -> WireGuard -> Peers, and create a peer. Input the necessary configuration information.
- Enable WireGuard in VPN -> WireGuard -> Settings, and click on the Apply Changes button. Ensure that the 'handshake' icon is green under the Status tab before proceeding.
- Go to Interfaces -> Assignments, and assign or add a new interface for the WireGuard tunnel you created in Step 2. Take note of the interface name (e.g., OPT1).
- Go to Interfaces -> [OPT1], tick the 'Enable interface' checkbox, input the MTU, static IP address, and the Netmaker network prefix.
- If connecting to a Netmaker Internet Gateway, click on the 'Add a new gateway' button. Depending on your use case, you may tick the Default Gateway checkbox.
- Create a Firewall rule allowing traffic from the Netmaker network to the target resource. Go to Firewall -> Rules -> [OPT1] and add a rule as needed.
2. OPNsense
This guide will help you set up WireGuard on OPNsense 24.1_1. We will connect to a Netmaker network via a Gateway.
- WireGuard comes pre-installed on OPNsense 24.1_1. For OPNsense 23.7.12 and below, install WireGuard as a plug-in in System -> Firmware -> Plugins.
- Go to VPN -> WireGuard -> Settings -> Instances, and create a new WireGuard tunnel instance using the configuration information provided by Netmaker.
- Go to VPN -> WireGuard -> Settings -> Peers, and create a WireGuard peer using the information provided by Netmaker.
- Enable WireGuard in VPN -> WireGuard -> Settings -> General. Click on the Apply Changes button.
- Go to Interfaces -> Assignments, and assign or add a new interface for the WireGuard tunnel.
- Go to Interfaces -> [OPT1], and tick the 'Enable interface' and the 'Prevent interface removal' checkboxes.
- Create a route to the Netmaker network by first creating a gateway. Go to System -> Gateways -> Configuration, then add a new gateway.
- Add the necessary routing entry. Go to System -> Routes -> Configuration, then add a route to the Netmaker network via the gateway created in the previous step.
- Create a Firewall rule for WireGuard allowing traffic between it and the target resource.
3. MikroTik
This guide will help you set up WireGuard on MikroTik 7.13.3. We will connect to a Netmaker network via a Gateway.
- WireGuard comes pre-installed on MikroTik 7.13.3.
- Use the following commands in MikroTik's CLI to configure WireGuard:
- Copy
/interface/wireguard
add name=wg-netmaker mtu=1420 private-key="iMfHqGANXMJHGMBKwuo89txiU3/9edC20TxWpFtmU2Y="

/interface/wireguard/peers
add allowed-address=10.40.70.0/24 endpoint-address=188.166.235.45 endpoint-port=51821 interface=wg-netmaker public-key="GM80g/eeXgkOrk0yYtdhhU73ETHffpojG2Ewd+N4kXI=" persistent-keepalive=20 client-dns=159.159.159.159

/ip/address
add address=10.40.70.254/32 interface=wg-netmaker

/ip/route
add dst-address=10.40.70.0/24 gateway=wg-netmaker
4. OpenWrt
This guide will help you set up WireGuard on OpenWrt 23.05.2. We will connect to a Netmaker network via Gateway.
- Go to System -> Software. Click on the Update lists… button then search for WireGuard. Install WireGuard-tools and luci-proto-WireGuard (for Web GUI). Reboot.
- Go to Network -> Interfaces, and add a new WireGuard tunnel interface.
- Click on Load Configuration…, paste the WireGuard configuration and click Import settings.
- Go to the Peers tab. Edit the generated peer, tick the Route Allowed IPs field. Save and apply the changes.
- Go to Status -> WireGuard and make sure that a handshake has taken place.
- Go to Network -> Firewall, and add a zone allowing traffic between the WireGuard tunnel and the LAN.
5. Other routers
Please refer to these links for instructions on how to configure WireGuard:
- TP-Link: https://www.tp-link.com/fr/support/faq/3772/
- Asus: https://www.asus.com/support/faq/1048281/
- GL.iNet: https://docs.gl-inet.com/router/en/3/tutorials/WireGuard_client/#setup-WireGuard-client
- Teltonika: https://wiki.teltonika-networks.com/view/WireGuard_Configuration_Example
- pcWRT: https://www.pcwrt.com/2019/12/how-to-set-up-a-WireGuard-vpn-client-connection-on-the-pcwrt-router/
- DD-WRT: https://windscribe.com/knowledge-base/articles/WireGuard-router-setup-guide-dd-wrt
Install Netmaker Desktop on Windows
Admins can also use Netmaker Desktop to gain remote access to the network with a different machine.
Install Netmaker Desktop on Mac
Admins can also use Netmaker Desktop to gain remote access to the network with a different machine.
Install Remote Access Client on Linux
Admins can also use RAC to gain remote access to the network with a different machine.
- Download and open the Netmaker Android app
- Accept the prompts to install a VPN configuration and allow push notifications
- Sign up using your team's email address
Admins can also use RAC to gain remote access to the network with a different machine.
- Download and open the Netmaker iOS app
- Accept the prompts to install a VPN configuration and allow push notifications
- Sign up using your team's email address


.svg)