What Is a Static IP Address? (+How to Set It Up)


An IP (internet protocol) address identifies a device on a network. So, a static IP means a device address that does not change. This permanence enables reliable communication and enhanced control for IT departments.
Benefits of using static IP addresses
Easier, safer remote access for employees
Static IPs can make remote access so much easier for your team. The consistency from each employee's device always having the same IP address simplifies your VPN configurations. You can set up access rules that recognize these IPs, ensuring a smooth access.
Another benefit is enhanced security. By using static IPs, you can whitelist IP addresses, allowing only known devices to access sensitive data. This is particularly useful for finance departments that handle a lot of confidential information. Being able to restrict access to specific IPs gives you peace of mind.
If you use VPNs to allow remote employees to securely access your internal network, static IPs will ensure that your VPN endpoints remain constant, making it easier for employees to connect without reconfiguring their settings. This consistency is crucial for maintaining productivity and security.
Static IPs also help when setting up remote desktop services. With a static IP, you can manage your servers from anywhere without running into connectivity issues. This is critical during an emergency when you have to fix a server problem while out of town.
Improved DNS support for corporate services
Dynamic IPs change over time. That constant change can cause disruptions and complicate DNS management. With a static IP, your server addresses remain unchanged, ensuring that DNS records are always pointing to the correct, consistent location.
For example, if hosting a corporate website, a dynamic IP can cause your site to be unreachable at times, as DNS propagation might not keep up with the changes. This could result in downtime and impact your web services. With a static IP, the DNS records don’t need constant updating, ensuring your website remains accessible without any hitches.
Using static IPs also simplifies your network administration and improves the reliability of your DNS-based services. If you are offering a service that requires high availability and consistent performance, such as video conferencing tools, static IPs ensure that DNS queries resolve correctly every time. This reliability will help you provide a seamless experience for your users.
Stability for hosting corporate websites and servers
Imagine you’re running an e-commerce site. You need customers to reach you 24/7 without any hiccups. If your website’s IP keeps changing, it’s like your customers having to search your address every time they want to visit. That’s where static IPs come into play.
Picture another scenario where you’re managing an internal company server that handles sensitive data—like payroll information or an internal communication tool. You wouldn’t want your employees to deal with the frustration of intermittent access. A static IP ensures that these servers are always reachable, making the user experience seamless and smooth.
Consider email servers, too. Businesses rely heavily on email for day-to-day operations. If your email server had a dynamic IP, it could easily end up on email blacklists because each new IP might be flagged as suspicious. With a static IP, your email server’s reputation stays intact, ensuring that your communications don’t get blocked or sent to spam.
Then there’s the security aspect. Static IPs make it easier to set up firewall rules and VPN access. With a fixed IP, you can create precise rules for who can access your network and from where. No more guessing games.
For example, you could set up a rule that only allows connections from your office’s static IP, adding an extra layer of security to your corporate network.
And then there are SSL certificates. When you’re setting up HTTPS for your corporate website, having a static IP makes the process straightforward.
Changing IPs can lead to certificate errors, confusing your users and possibly scaring them away. A static IP ensures that the transition to a secure site is smooth, maintaining the trust of your clients and partners.
Types of static IPs (IPv4 vs. IPv6)
IPv4 (Internet Protocol version 4)
IPv4 is the most commonly used IP version. An IPv4 address looks something like this: `192.168.1.1’. It consists of four sets of numbers ranging from 0 to 255, separated by dots.
That format gives us about 4.3 billion unique IP addresses. While that sounds like a lot, we've actually exhausted most of these addresses. That’s because the internet has grown way beyond what the IPv4 system can accommodate.
IPv6 (Internet Protocol version 6)
IPv6 was developed to solve the address exhaustion problem of IPv4. An IPv6 address looks quite different: `2001:0db8:85a3:0000:0000:8a2e:0370:7334`. It uses hexadecimal numbers and colons instead of dots.
That format allows for an astronomical number of unique IP addresses—about 340 undecillion (that’s 340 followed by 36 zeros). So, we’re not running out of IPv6 addresses anytime soon.
From a user perspective, you might not notice a huge difference between IPv4 and IPv6. Both serve the same fundamental purpose: they identify devices on a network.
However, IPv6 comes with some added benefits. It has improved routing and network autoconfiguration, which means it can streamline some network management tasks.
For instance, say you’re setting up a corporate network. With IPv4, you'd probably have a range of addresses like `192.168.1.1` to `192.168.1.254`. Each device gets a unique IP within that range. With IPv6, you'd have a much larger pool to work with, something like `2001:0db8:85a3::/64`. Every device can have its own globally unique address without conflicts.
That said, not all systems and applications fully support IPv6 yet. While many modern devices and operating systems do, you might still encounter some legacy systems that rely solely on IPv4. It's essential to consider this when planning your network infrastructure.
How to set up a static IP in a corporate network
When setting up a static IP in a corporate network you'll need the IP address you want to assign, the subnet mask, the default gateway, and the DNS server addresses. Once you have this information:
- go to the device you want to set up with a static IP. If you're on a Windows machine, open the Control Panel and go to 'Network and Sharing Center.'
- Click on 'Change adapter settings' on the left-hand side.
- Find your network connection, right-click on it, and select 'Properties.'
- Look for 'Internet Protocol Version 4 (TCP/IPv4)' in the list, select it, and click on 'Properties.'
In the window that pops up, you'll see two options. One for automatically obtaining an IP address, and one for using a specific IP address. Select 'Use the following IP address' and enter the IP address, subnet mask, and gateway that you gathered earlier. Do the same for the DNS servers but in the 'Use the following DNS server addresses' section. Click 'OK' to save your settings.
For macOS, you’ll start by opening 'System Preferences' and selecting 'Network.' Choose the network connection you want to configure, typically Ethernet or Wi-Fi, and click 'Advanced.' Navigate to the 'TCP/IP' tab.
There, you'll find a dropdown menu next to 'Configure IPv4.' Select 'Manually' and then enter your IP address, subnet mask, and router (gateway) information. Switch to the 'DNS' tab to add the DNS server addresses.
Linux users can set a static IP by editing the network configuration files directly. For instance, if you're using Ubuntu, open a terminal and edit the file `/etc/netplan/01-netcfg.yaml` (the exact file name might vary). You would add something like (this code snippet might also vary):
After saving the file, apply the changes by running `sudo netplan apply`.
Remember, if you’re managing a larger network, you might be using a DHCP server with reservations instead. This method binds a specific IP to a device’s MAC address, effectively giving it a static IP without manual configuration on the device itself. You can do this through your router’s interface. Look for a DHCP reservations section, add a new entry, and input the device’s MAC address along with the desired IP.
Following these steps ensures that your devices keep the same IP address, making them easier to manage and troubleshoot within the corporate network.
How to assign a static IP on Windows servers
First, open the Control Panel. You can do this by clicking on the Start menu and typing "Control Panel." Once it's open, find "Network and Sharing Center" and click on it.
Next, look for "Change adapter settings" on the left sidebar and click on that. You should see a list of network connections. Find the one you want to assign a static IP to. It’s usually named something like "Ethernet" or "Local Area Connection." Right-click on it and select "Properties."
A new window will pop up. In this window, scroll down until you see "Internet Protocol Version 4 (TCP/IPv4)." Click on it, then click on the "Properties" button just below the list. You’ll be greeted with a new dialog box.
In this dialog box, you’ll want to select "Use the following IP address." This allows you to manually enter your static IP details.
Don’t forget the DNS servers. Click "Use the following DNS server addresses" and enter the preferred and alternate DNS server addresses your network admin provided. For instance, if your preferred DNS server is 8.8.8.8 and the alternate is 8.8.4.4, pop those into the DNS fields.
Once you’ve entered all the necessary information, click "OK" to close the dialog boxes. You can now close all the other windows as well. To double-check your work, you might want to open Command Prompt and type `ipconfig` to see if your static IP details show up correctly.
How to assign a static IP on macOS
Begin by clicking the Apple Menu located at the top left corner of your screen and then selecting "System Preferences." In the System Preferences window, click on "Network." On the left panel, choose "Ethernet" to configure the wired network settings. If I’m using Wi-Fi, I would choose "Wi-Fi" instead.
Once you have selected Ethernet, look for the "Configure IPv4" drop-down menu in the main part of the window and change it to "Manually." This action reveals several fields that need to be filled out.
Enter your desired static IP address in the "IP Address" field; for example, "192.168.1.100." Next, enter the subnet mask, typically "255.255.255.0," in the "Subnet Mask" field.
Moving on, enter the gateway or router address, such as "192.168.1.1," in the "Router" field. This step ensures that your Mac can communicate with the broader network and the internet. After entering these details, click the "Advanced" button at the bottom right of the window to open additional settings.
In the advanced network settings, switch to the "DNS" tab. Here, click the plus button at the bottom-left corner of the "DNS Servers" field to add a new DNS server address. Type in the primary DNS server, for instance, "8.8.8.8."
To add a secondary DNS server, click the plus button again and enter another address like "8.8.4.4." These DNS servers help your Mac resolve domain names to IP addresses.
After adding the DNS servers, click "OK" to close the advanced settings window. Back in the main Network window, hit "Apply" to save all the changes you have made. Finally, close the Network preferences window to complete the setup.
How to assign a static IP on Linux servers
First launch the terminal using the shortcut `Ctrl+Alt+t`. This brings up the command line interface where you can input necessary commands.
You need to gather details about your current network setup such as the assigned IP, subnet mask, and the network adapter's name. Do this by running the `ip a` command, which provides you with a comprehensive overview of your network interfaces and their statuses.
Next, you need to make configuration changes to set the static IP. For newer versions of Ubuntu, the default network management tool is Netplan. Netplan configuration files are in YAML format and located in the `/etc/netplan` directory. Navigate to this directory and look for existing configuration files using the `ls` command.
If no files are present, create one. By convention, name it something like `01-network-manager-all.yaml`.
Inside this file, start with the basic structure of Netplan configuration. Add:
This marks the beginning and indicates you are using network definition version 2. Then, set the renderer to `NetworkManager` for better control. The file now looks like this:
Next, specify the network adapter from step 2. Add this under an `ethernets` block, and since you want to assign a static IP, disable DHCP by setting `dhcp4` to `no`:
Then, define the static IP address within the usable range calculated earlier. Also specify the gateway and DNS servers. Your final configuration looks like this:
Before applying these changes permanently, test them with the `sudo netplan try` command. If there are no errors, it prompts you to confirm the settings.
Finally, check if the static IP has been applied correctly by running the `ip a` command again. Following these steps ensures your server retains the same IP address every time it boots up, making it easier to manage and configure for different purposes in a corporate network.
Router configuration for a corporate static IP
First, log into the router’s web interface. Usually, you would enter the router's local IP address, like `192.168.1.1`, into the web browser. When the login page appears, enter the admin credentials provided by the ISP or network admin.
Once you are logged in, navigate to the DHCP settings. Most routers have this in the LAN setup section. Find the option to reserve IP addresses, sometimes called DHCP Reservation or Static DHCP. Here, add the MAC address and the desired static IP for each device.
For example, you can assign `192.168.1.100` to a printer with a MAC address of `00:1A:2B:3C:4D:5E`. This ensures the printer always gets that IP.
The next step is setting the subnet mask. This defines the network’s size. For example, `255.255.255.0` supports up to 254 devices. For larger networks, a different subnet mask would be needed. This simple setup works well for small to medium businesses.
Also adjust the DNS settings. Google’s DNS with IPs `8.8.8.8` and `8.8.4.4` is more reliable. Enter these in the router’s DNS settings, ensuring all devices on the network use these servers.
Finally, save the changes and reboot the router. After it restarts, check the devices to ensure they have received their assigned IPs. This process keeps your network organized and avoids IP conflicts. It also makes managing networked resources, like printers and servers, much easier.
When to use static IPs in a corporate setting
Static IPs are essential for situations where consistency and reliability are crucial. They ensure that users and services can always reach them at the same address. This is especially important for intranet websites, file servers, or mail servers that employees need to access constantly.
Take network printers as another example. By assigning them static IPs, everyone in the office can effortlessly connect to the same printer without the hassle of frequent IP changes. This not only simplifies configuration but also reduces downtime and support calls.
Security systems in your office also benefit from static IP addresses. Surveillance cameras and access control systems need to be highly reliable. With static IPs, these devices can always be monitored and managed correctly. It’s essential for quick access, especially if you need to respond to incidents rapidly.
Your VoIP phones are another great case for static IPs. Stable connections are vital for call quality and reliability. By assigning static IPs to your phones, we can ensure a smoother communication experience without unexpected interruptions.
Even some of your more sophisticated network equipment, like routers and switches, benefit from static IPs. Management and troubleshooting become much more straightforward when these devices are always reachable at a fixed address.
When to use dynamic IPs in a corporate setting
Dynamic IP addresses also have their place in corporate settings. They are great when you need flexibility. For example, in conference rooms where different devices need to connect to the network. With dynamic IPs, your network can automatically assign an IP address to each device, making it a breeze to manage.
Another perfect example is the guest Wi-Fi network. Visitors come and go, and their devices only need temporary access. Dynamic IP makes sure they get connected without you lifting a finger. This approach also helps keep things secure since every time a guest connects, they get a fresh IP address.
Consider the employee break room with its shared devices. Imagine a couple of tablets used for quick browsing or checking schedules. Dynamic IPs ensure these devices get connected effortlessly without requiring manual IP configuration every single time.
On the IT side, managing a growing number of devices becomes simpler. With dynamic IPs, there's no need to assign each new device a specific IP address manually. This automation saves time and reduces the risk of errors. The DHCP server takes care of all the nitty-gritty details, making the network administrator’s job much easier.
Think about scalability, too. As your company grows, so does the number of devices on your network. Dynamic IP ensures you can expand without a hiccup. New devices can join the network right away without the need for a static IP configuration.
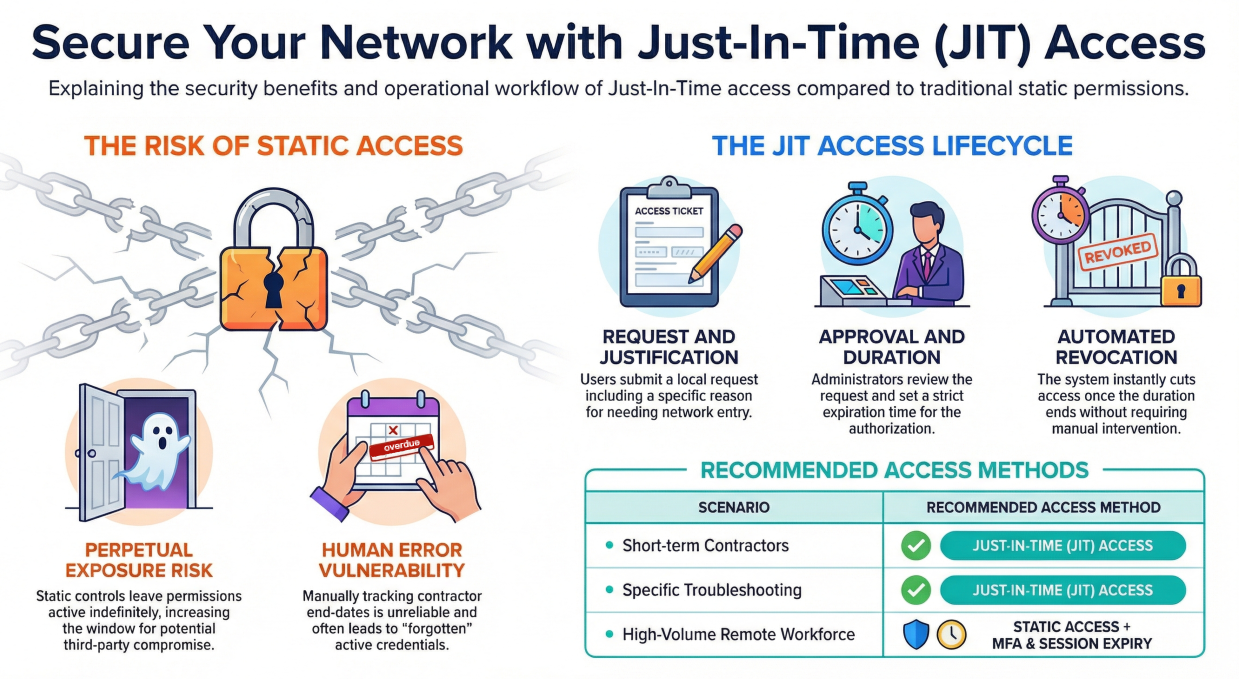
Use Static Vitual IPs With Netmaker
An alternative approach would be to provide a virtual address, using an SDN or VPN platform like Netmaker. By adding a virtual address to your endpoint, you can provide a fixed but secure IP, which itself can be traversed over dynamic IP addresses. Check out Netmaker to learn more.


.svg)